
This year, my husband and I bought our first real Christmas tree. We went to the tree farm, rode a hay ride, chopped it down while sipping apple cider... 'twas lovely. Initially I hated the idea of cutting down a living tree, but my husband reminded me that on this Christmas tree farm, they plant a new tree for every chopped one, and I reconciled my conscience.

Here's my manly men a-choppin'!
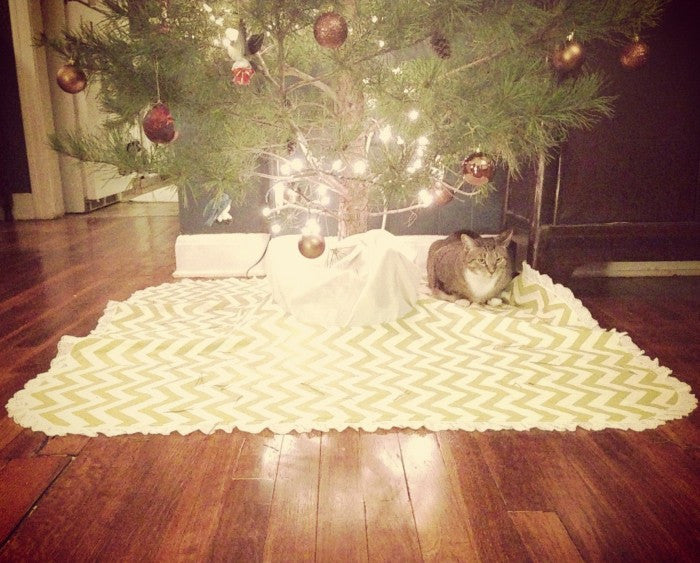
Once it was proudly erect in our living room, making the whole house smell of perfection, I realized we needed a family tree skirt! Now, I could have headed over to any number of cute skirt-selling stores, OR I could add another project to my endless list of to-dos.... I chose the latter! And so happy am I that I did. It is super simple! If you can sew in a straight line, you can do this-- promise! Materials:
- 1 1/4 yd fabric (standard 45" wide fabric, otherwise adjust so you have a 45" square) for the top of the skirt
- 1 1/4 yd fabric for the backside
- 45" x 45" batting (not absolutely necessary, just adds a nice weight)
- Large safety pins and straight pins
- thread
- Lace or other trim (optional)
- 4 ft. ribbon for ties (I used some extra bias tape I had)

- Make your "quilt sandwich" by layering your fabric and batting : First layer the front and back fabrics with their right-sides facing one another, then lay the batting on top. Smooth out all wrinkles, and place a few safety pins to hold the layers in place (about every 8").
- Fold the layers in half length-wise, then again width-wise. On the corner with two folds, trace where you intend to cut out the hole. I measured the diameter of the top of our tree stand. It was 12" wide, so I measured 6" across, up, and diagonal from the corner, marked each, and connected the dots.
- Cut out the circle. Now round the opposite corner. Unfold the quilt sandwich and cut along one of the folds, to create the opening.
- (If you are not including a trim, you may skip steps 4 & 5) Take your trim and place between the top and bottom pieces of fabric, lining up the edge to be sewn with the raw edge of your quilt. Pin the lace and three other layers in place with straight pins.
- Be sure to roll the lace in at the corners, so you don't accidentally sew over them.
- With a about 1/4" seam allowance, sew the edges around your quilt. However, don't yet sew the opening where you will place your ties.
- Remove safety pins, turn your quilt right-side-out, and press. Replace safety pins every 4" for topstitching and quilting. I placed basting clips around the edges to hole them in place, but this is not necessary.
- On the opening panels, fold the edges inward and press. Tuck your 12" long ties between the layers and pin in place with straight pins. Top stitch around the edge of your entire quilt, leaving about 1/4" seam allowance. Be sure to secure the loose edges of your panels.
- Last step-- quilting! If you do not wish to quilt your skirt, you can call it a day. I chose to quilt it to keep the layers nicely together, to add durability, and because I like quilting so darn much. If you've never quilted anything before, this is the perfect project to start! It is small and easy-- give it a try! Quilting is just running a stitch down the top of the quilt so the layers are secured in place. Simple. You can run your stitched in straight lines down your quilt (see the batting instructions for how far apart your quilted lines should be-- typically about 4" apart); Since I chose a chevron pattern, there were built-in guide lines for my stitched, so I simple followed the zig-zags down the quilt. Be sure to secure your thread at the beginning and end of each row (sew a couple stitched forward, then back). I began and ended each row at the topstitch line.