You know how some scrappy quilts can look super gorgeous and unexpected, while others look like the quilter had a tad too much wine??
Here are a couple fun effects to make your next scrappy quilt look lovely, and not like a hot mess!
These effects tells a story. They guide the viewers eye from one side to the other. They are orderly and are great ways to structure a scrappy quilt.
Here are a couple fun effects to make your next scrappy quilt look lovely, and not like a hot mess!
These effects tells a story. They guide the viewers eye from one side to the other. They are orderly and are great ways to structure a scrappy quilt.
I'm calling them the Progression Effect.
Now, there are 2 types of Progression Effects that I'm going to talk about today: the Value Progression and the Color Progression. Both are VERY easy to execute and will create a very orderly appearance in your quilt.
_______________________________________
1. Value Progression
Remember, value is the darkness or lightness of a color. So for a Value Progression, you will order your fabrics from light to dark or dark to light.

(Bear made by Hawthorn Threads.) I love how they progressed from dark at the bottom up to light at the top.
2. Color Progression
To create a Color Progression, you simply start with one color, then move left or right around the wheel, in order.


Starting at the top, I have oranges, then moving down to yellows, then greens with some neutrals thrown in there. This guides the eye from the top to the bottom of the quilt. (Strippy Bear Quilt Pattern, here)
_______________________________________
Both Progressions Together
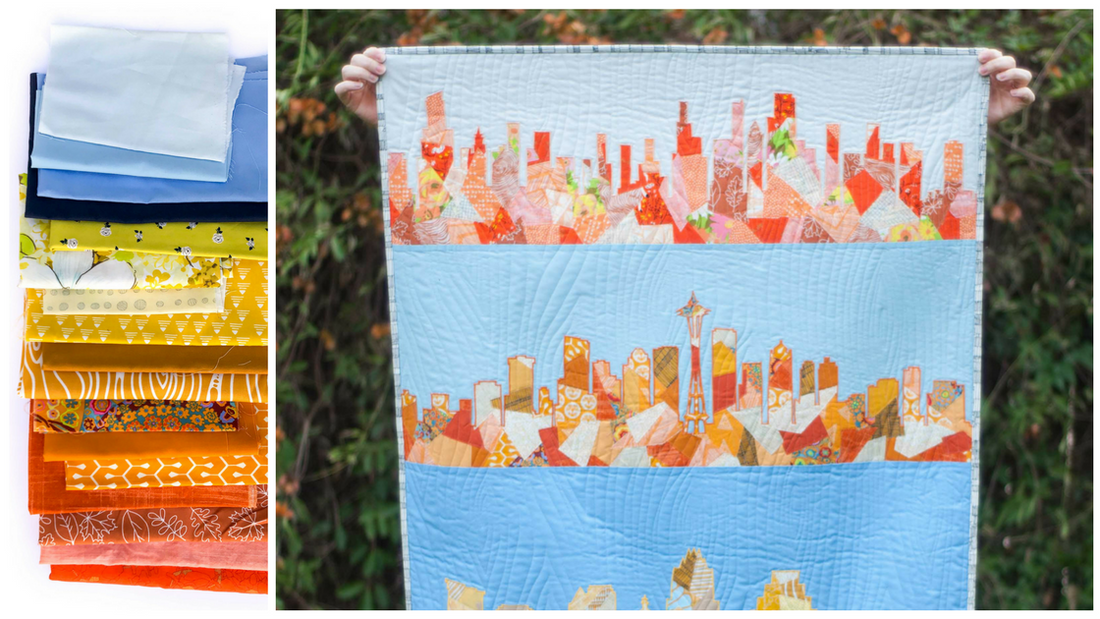
For the quilt below, I used both types of progressions in the same quilt.
I've made MANY different skyline quilts the last few years. Most were wallhangings due to the wide, thin shape of the templates. But I knew I wanted to try something different with this one. I wanted to make these wide, thin appliqué pieces into a row quilt. I wanted each row to be different, but I also wanted them to be cohesive, so I thought I'd play with creating an "ombre" effect in the quilt, or a Value Progression.
I knew I wanted blue backgrounds, so I chose a range of blues from light to dark. This change in value helped visually separate the rows, but since the colors progressed in an order, the differences were very subtle and orderly. That helped draw all the focus to these vibrant skylines, and led the viewers eye from top to bottom.

For the appliqué pieces themselves, rather than continuing with the Value Progression, I wanted to try a red to yellow Color Progression.
So I started with orangey-red fabrics for the first skyline, then moved clockwise around the color wheel. Next to orange, then orangey-yellow, then yellow.
Both these effects, the Value Progression and the Color Progression when used together or separately, help guide the viewer's eye from one side to the next. They create order and calm.
There are so many different ways you can use these effects. Have you every used either of these effect in your quilts? Think you might want to give it a try?


8 comments
This makes so much sense. I’ve never liked any scrappy quilts and my stash is very bitty as I’m new to all this and I keep buying odd bits of fabric from sales tables, bargain bins etc and they just don’t go together. I want to go and sort my fabric by these seasonal colour tones not just by colour. I think it will work for me better. You have given me new heart.
Really like the colour progression on the bear quilt! Am looking forward to trying it very soon.
Love the progression from light (daytime) to dark (nightime).