

I love mixing up the shape of pillows on my couch, and I also love a good floor pillow to instantly make any space cozier. They are great to lean against while reading, take on a picnic, or for your kiddo to lay on while watching a movie.
When I was making samples for my new GLOBE pattern, my son said, "Wouldn't it be cool to make that into a giant circular pillow?"
Brilliant!

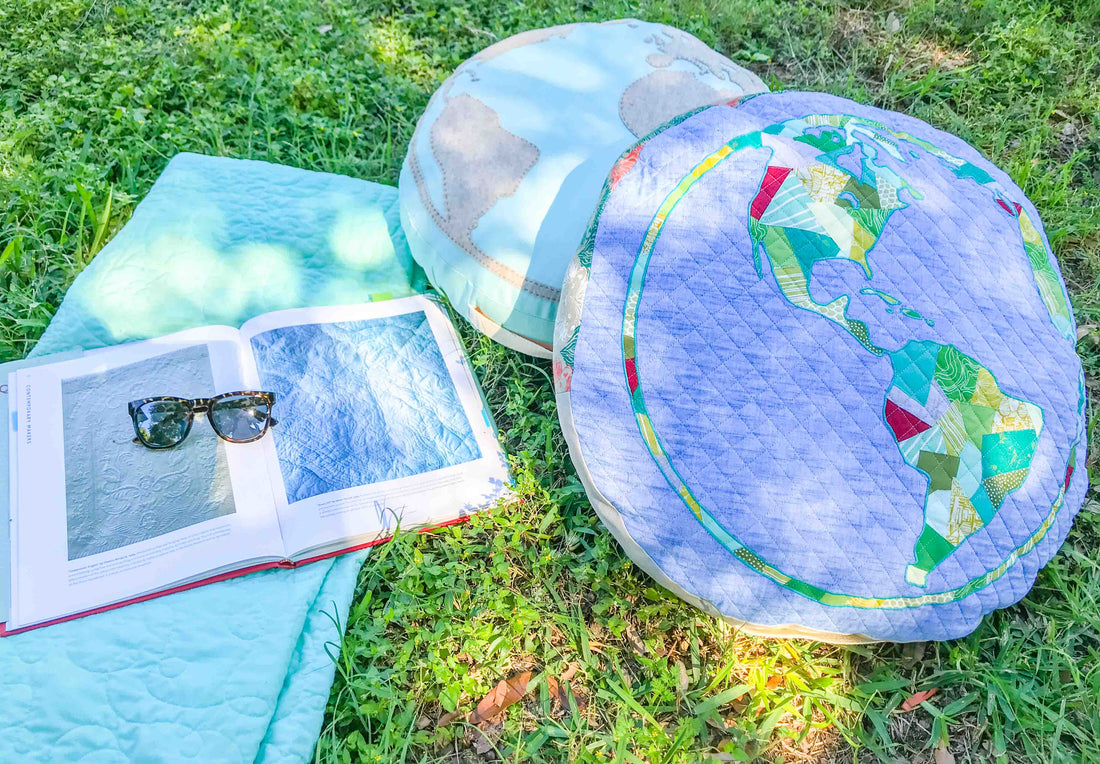
The first one I made was this quilted floor pillow, using my Scrappy Appliqué technique (instructions are in the GLOBE pattern). I quilted the top, then used a gray canvas for the back and this great Cotton and Steel lion canvas fabric (that I had leftover from reupholstering our dining room chairs) for the side strip.

I wanted to try something different for the second pillow, so I used my Simple Raw edge Appliqué method, but used a nice felt fabric so I could leave the edges raw and not worry about fraying (a knit would have worked great too). I then hand-stitched a running stitch around the edges. You could do this by machine, I just love the look of a hand running stitch and enjoy handwork.

There are a lot of ways you can get creative with these pillow, whether it is your choice of appliqué piece/finishing option, your fabric choice, etc. The pattern includes multiple sizes and shows how to easily install a hidden zipper and a strap.
The zipper makes it easy to add or remove poly-fil, you could also make a pillow insert, so you can wash the case on its own. If you've never installed a zipper, don't be intimidated! If you can piece together two pieces of fabric and you own a zipper foot (it probably came with your machine, check your manual), then you can absolutely install a zipper-- it's super simple.
The strap makes it easy to tote around and/or hang from a hook on the wall for easy/cute storage.
Now, let's get sewing!

_________________
Round Pillows
Materials
| Large Couch Pillow (20") | Floor Pillow (22") | Giant Floor Pillow (28") | |
| Pillow Fabric* | 1 yd | 1 yd | 2 yds |
| Stuffing** | 20-32 oz | 32 oz | 32-48 oz |
|
Pillow Insert Fabric*** |
1 yd | 1 yd | 2 yds |
|
Circle Template |
20.5" | 22.5" | 28.5" |
|
Suggested GLOBE Template Size**** |
small | small |
small template or medium template printed at 90% scale |
Fabric recommendations are based on 44" wide fabric.
*I recommend canvas, other home decor fabric, or quilted pieces
**Poly-fil or other stuffing (like shredded memory foam). I bought this and had enough for 4 floor pillows.
***I suggest using muslin, or other thin, inexpensive fabric.
****My Globe Applique Pattern includes 4 different views of the globe, each in 3 different sizes. See pattern for additional applique material requirements.
Other Materials Needed
- Zipper (Optional): 7" or 14" zipper. If making a pillow insert, use a 14" zipper, otherwise use 7".
- Strap (Optional): 1" wide Webbing -- a 9" piece (or length of your zipper + 2")
- Thread
- Basic sewing supplies
Instructions
- Download and Print the free Circle Template and tape together, according to the printing instructions.
- Choose which sized circle you will need, based on the materials chart above. Cut out the circle template along the line to use as a stencil.
- Lay the stencil on top of the pillow top, and trace around using a chalk or disappearing ink marking tool.
- Cut out the top.
- Repeat for the back of the pillow.
- Make the Pillow top according to the directions in the GLOBE pattern, using the template size suggested in the materials chart above. If making a plain pillow (with no appliqué), skip this step. I recommend either quilting the pillow top or using a canvas as the background fabric.

- For the 20" & 22" pillows, cut two 3.5" X WOF (width of fabric) strips (If you'd like to make it fatter than the pillows pictured, cut wider strips.) For the 28" pillow, cut three 6.5" X WOF strips.
- If adding a zipper or strap, cut off a segment of one of the strips that is the full length of the zipper (I used a 7" zipper, but the full length is about 8.5").

- If installing a zipper and/or strap:
- To install a zipper:
-
Cut the strip segment in half length-wise.

-
Line up the outside edges of one half to the zipper, right sides together. Using a zipper foot, sew zipper to the first half. Press seams away from zipper. (When sewing the zipper, the zipper pull can get in the way of the foot. I always keep the pull in front of or behind the foot while sewing. I had to, with my needle down, raise my foot in order to get the zipper pull behind the foot.)


- Lay the second fabric half on top, aligning with the other edge of the zipper, right sides together. Sew another seam. Press seams away from zipper. Easy!


- To add a strap:
- Cut webbing the length of the strip segment.
-
Pin either side of the webbing to the strip segment's short edges, covering the zipper. (the strap will get secured in the next step)

- Piece together the strips using a 1/2" seam allowance. If you installed a zipper and/or strap, make sure the zipper/strap segment is in the middle, and sew back over the strap a couple times to reinforce the stitches. Press seams away from zipper.

-
With the zipper unzipped, position the zipper segment where you'd like (I put it at the bottom of the pillow, but if I were to do it again, I'd put it at the top in case I decided to hang them from a hook on the wall for storage). Line up the raw edges of the pillow top and strip, right sides together, pin in place. Continue pinning until the strip ends meet opposite the zipper/strap. Fold excess strip fabric back, lining up the strip folds, so they meet.

- Press those folds, then place a pin in them.

- Sew along the fold.

- Trim excess strip fabric, and press seam open. Finish pinning strip.

- Sew 1/4" seam around edge, removing pins as you come to them. Be sure to lock your stitch when you begin and end. (To lock your stitch, stitch forward once, then back once, then forward once again, and back once again.)

- Press seam to one side, I pressed away from the top.
- Place this pillow top/strip piece against the back of the pillow circle fabric, lining up raw edges, right sides together. Pin around edges, then sew a 1/4" seam. If you did not install a zipper, leave a 4" section open.

- Turn right-side out.
- Finishing:


- If you didn't install a zipper, fill with stuffing, then hand stitch the opening closed with a whip stitch.
- If making a pillow insert, repeat steps 4-17 using the muslin fabric, excluding the zipper and strap. Fill with stuffing, then hand stitch the opening closed with a whip stitch. Pop the insert into the pillow case and zip closed!
- If you installed a zipper, but are not making an insert, simply stuff the pillow case with stuffing and zip closed. (If you are making this pillow for a little one, and you worry they may unzip and pull out the stuffing; you can hand sew the zipper closed by looping thread through the hole in the zipper pull and tacking that down. You will be able to easily snip that if you need to add or remove polyfil, but your kiddo won't be able to unzip it and make a mess.)


Here's my kiddo enjoying this comfy pillow!
You can easily modify this pattern to make it your own, here are some ideas:
- Use a different applique template.
- Make it thicker (more like a pouf) by cutting the side strips wider.
- Piece together the front, back, and/or side pieces for a cute patchwork look. (This would be a nice way to use up orphan quilt blocks from past projects.)
- Make it bigger or smaller by using one of the other Circle Template sizes included in the download.
I hope you enjoy your new cozy pillows, and happy sewing!
4 comments
How do I measure the fabric for cover on an already made round cushion
Thank you for a nice pillow pattern! I’m excited to make one.
Shannon:
That was a really nice tutorial on making a circular pillow. I like your word choices and comfy delivery of instructions. Professional and personal at the same time. The inclusion of your son with the floor pillow is great. He takes after his mama. I am excited to make some circle pillows, and buy the Globe pattern. I just have to remember between work (where I see your emails) and home (where the computer to buy it is). Thanks VERY much! Liz Pettijohn
Is the free pillow pattern something I can download? I don’t have internet at home and it’s hard to use on my phone.